Voicemeeter banana is a free software for Windows that can be used to manage audio devices, audio hardware, and other applications, such as MS Teams. This means you can have your teammates in a Discord call and be able to chat with them without your stream being able to hear them.
By dividing the audio input, you can lower discord in case they’re too loud while you’re recording or streaming.
This post will walk you step-by-step through the process of setting up Voicemeeter with your Discord account so that you can enjoy the service to its full ability.
How to Set Up Voicemeeter with Discord
Setting up the different audio devices is fairly easy, but you do need to make sure that you pay attention to this guide, or it might not work out the way you imagine. Before you start changing audio channels, download the Voicemeeter Banana and virtual audio cable.
Both of these can be found on the website of Voicemeeter Banana itself, this will make it easier in the process of setting everything up. If you want to use Voicemeeter with Discord, complete the following steps:
-
Step 1
Open up Voicemeeter Banana, this will give you an outlay that is similar to a mixer. You have three hardware input options, two virtual input options, and three hardware outputs.
-
Step 2
First, you will need to set up your speakers. To do this, find the hardware out in the top right corner and select your speakers or headphones as the output device under A1.

This means that whatever hardware input devices you set up, you will also have to select A1 if you want to hear it in your headphones.
If you also want to listen through your speakers connected, make sure to add both Headphones and speakers as your hardware outs in A1 and A2.
-
Step 3
Before doing anything else, you will first have to change the system sounds on your computer. You do this by going into your control panel and searching for change system sounds. This will cause an extra screen to pop up.
-
Step 4
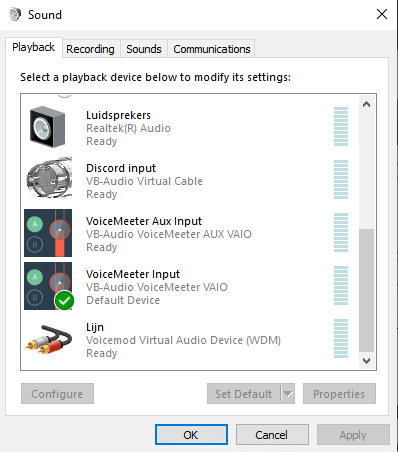
In the sound control panel, it will show all your audio devices. One of them has a green check as a default device. Most likely, this will be set to your speakers or your headphones. You will need to change this so that it goes through Voicemeeter Banana.

Scroll all the way down until you find the Voicemeeter input and Voicemeeter aux input. Of these two, choose Voicemeeter input as the default device. Now when you play music, it will go through Voicemeeter, and you will be able to hear it.
-
Step 5
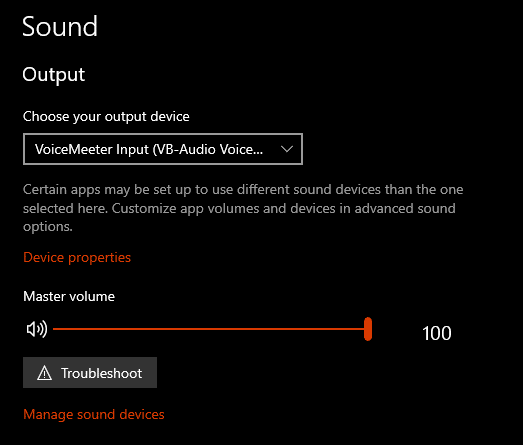
Go to your windows sound settings on your computer, here you will have to choose the Voicemeeter input as your output.

This does mean that if you want to control your desktop audio volume, you will have to do that through Voicemeeter and not through the sound settings like you would normally do.
-
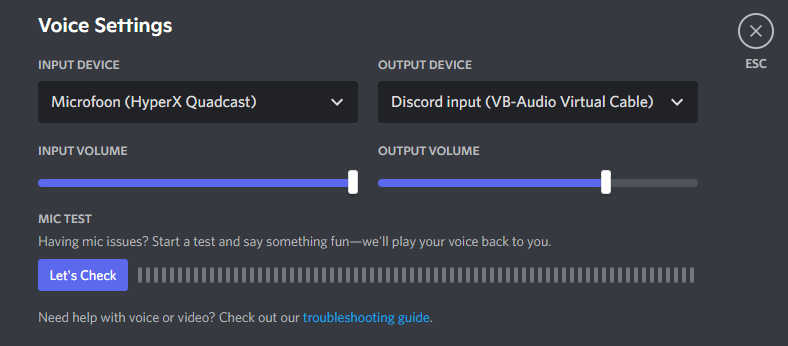
Step 6

Now you have to go to Discord and your discord settings. Specifically the voice & video settings, here you have to set discord’s output device to discord input (vb audio virtual cable).
-
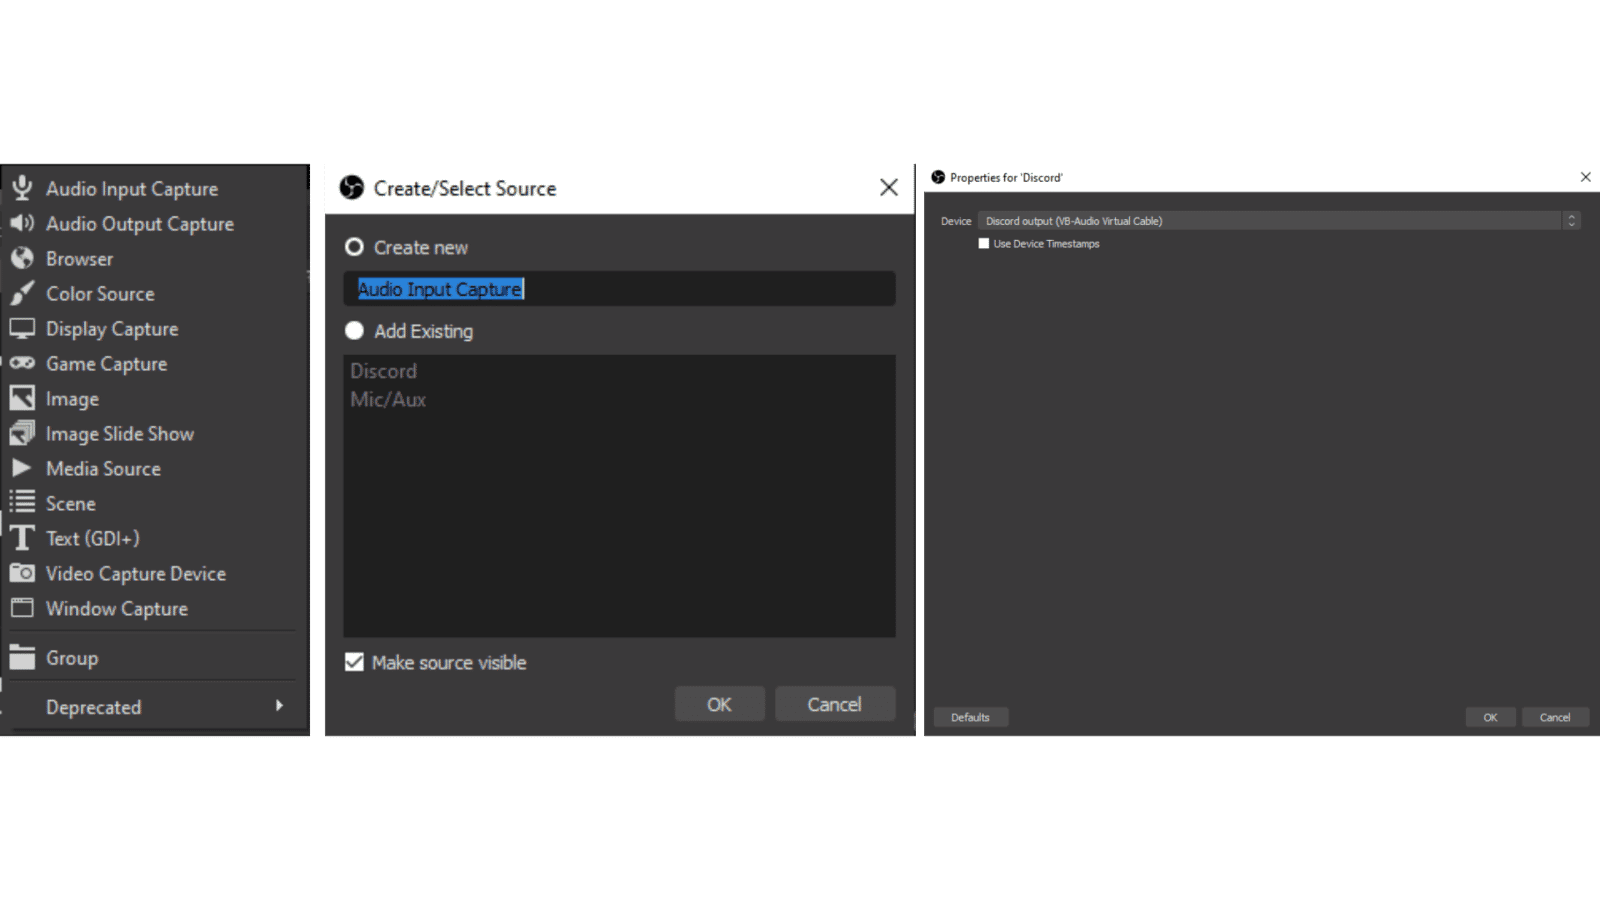
Step 7
To ensure that you can have Discord as a separate audio source in OBS, we have to put Discord as a hardware input. You must select Discord output (vb audio virtual audio cable) to do this. When we later go into OBS, this will help us easily set up a separate audio device.
-
Step 8
Next, we are going to set up your microphone input. We do this by clicking on “select input device” under the hardware input option 1 and choosing your microphone.
Make sure to choose the WDM option for this. You can then choose to hear yourself through your microphone by selecting A1 next to the slider.
-
Step 9

Now we go into OBS to set up our audio sources and go into the scene you want to have your discord. Add a new audio input capture in this scene and choose Discord output as the device.
-
Step 10
Now you have to repeat the source step in every scene you want to have on Discord, and you’re all ready to go for your stream.
A small note to remember, if ever, during you are setting up everything, the sound stops working. Make sure to reselect your headphones or speakers as an output device so so that you can continue setting everything up.

Benefits of Using Voicemeeter Banana with Discord
There are various benefits to using Voicemeeter Banana with Discord and streaming in general. Here are a few of the things you may be able to expect when you use Voicemeeter with Discord:
- You can make sure that you’re only recording selected audio channels.
- Your sound control panel might be bigger, but it is all separated, which makes it easier to control.
- You can still play music without your stream’s audience hearing it, allowing yourself to enjoy your favorite tunes withou worrying that you are breaking Twitch DMCA laws.
- Not everything will be routed through your desktop audio.
Conclusion
If you want to separate your audio, then it’s best to use Voicemeeter as it is not just beneficial for you but also for your stream. Additionally, it is very easy to use!
Now you know how to set up this fantastic software for Discord and OBS, but you can use it for many other apps similarly. You just need to change around the inputs and outputs, so you can hear the audio in the correct way.
Don’t forget to also select the right microphone input so you can be heard. Remember that you can always adjust your setup later until it works perfectly. We hope that this guide has been useful in teaching you how to use Voicemeeter with Discord.

Onyxia
Onyxia is a content creator college student from the Netherlands, who recently got into streaming. She loves to share her knowledge and love for writing and streaming with people and is also passionate about building an understanding and open-minded community.