
You log into Streamlabs for the first time, or maybe you have an established community, but the unthinkable happens. A giant black box appears where your display should be. Naturally, panic ensues. Scanning through the settings, no obvious issues jump out at you.
Streamlabs settings can be confusing and even a little terrifying. Today I’m here to teach you what may be causing this black box and provide some solutions, without any worry that you may be damaging your PC software.
What Causes the Black Screen on Streamlabs?
The issues that one faces when seeing a black box can vary. To start, make sure that you have Streamlabs running as administrator. This allows Streamlabs to have more wiggle room and access to your PC.
Personally, I have experienced not having a display capture or a game capture source added as an overlay. This is the easiest and quickest issue to test and a common issue streamers have.
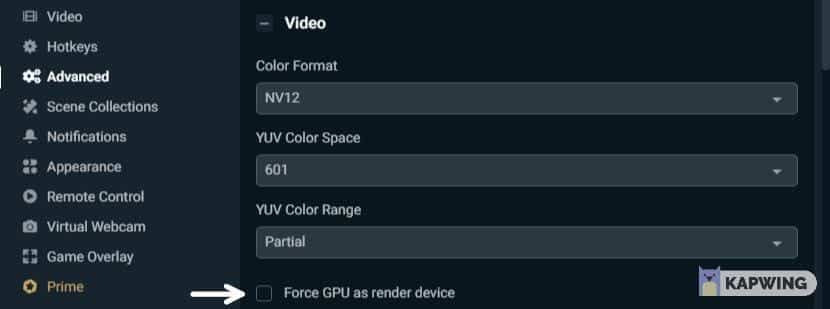
If this still does not resolve your black screen, it may be due to a certain setting called, “Force GPU as render device”. Unchecking this box, in a sense, frees up your GPU, possibly allowing you to see your stream.
Other issues, such as needing to allow Streamlabs to run with your integrated graphics card could be the root cause. Although this only applies if you have a graphics card integrated into your motherboard. Otherwise, the option to do so will not appear. So let’s correct this problem, shall we?
How to Fix Black Screen on Streamlabs OBS
First, make sure all of your drivers are updated. If they are not up to date, update all of them and try Streamlabs again before continuing.
If that fails to work, try one of the following solutions:
1. Make Sure You have a Display Capture Source Added to your Overlay
You’d be surprised by how many people don’t have a display source added into their overlay. I am familiar with this issue, as I was one of these people! To resolve this follow these steps:
-
Step 1
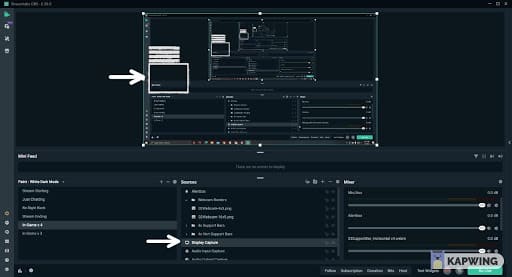
Open Streamlabs, under the “Sources” box (middle of the screen), select the “+” symbol.
-
Step 2
On the left side, under “Standard”, locate “Display Capture”, click it and add it as a source.
-
Step 3

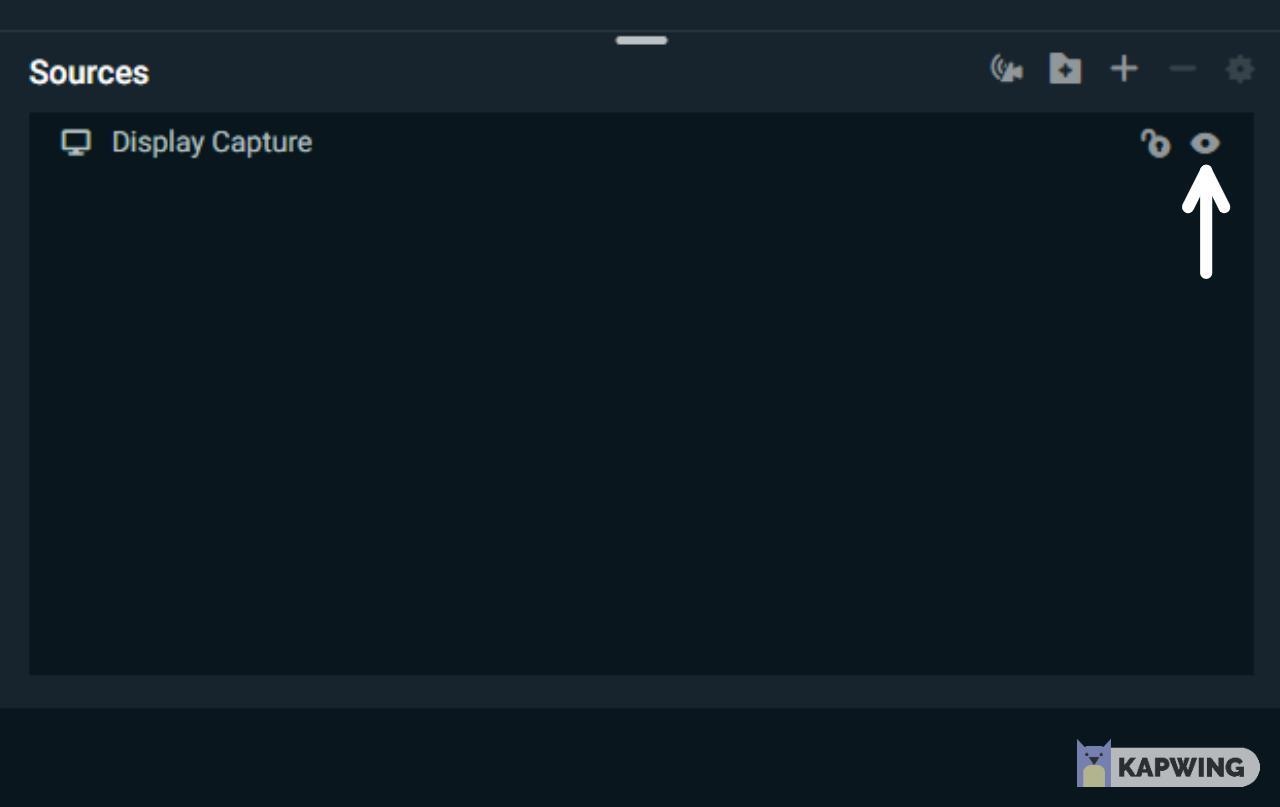
Make sure the eyeball next to the “Display Capture” source is on.
-
Step 4

Layer your sources properly. For example, make sure that your webcam, alert box, and any other sources you want to be displayed are on TOP of your display capture.
2. Uncheck “Force GPU as Render Device”
I’ve seen this help quite a few people. It’s a little hidden in settings so follow these steps:
-
Step 1
Open Streamlabs OBS and navigate to the settings icon on the left.
-
Step 2
Click on the “Advanced” settings tab which should be located about half-way down.
-
Step 3

Under “Video” uncheck “Force GPU as Render Device.”
-
Step 4
Click “Done” and restart Streamlabs.
3. Run Streamlabs OBS as administrator
-
Step 1
Right Click on the shortcut you created for Streamlabs on your desktop and select “Properties.”
-
Step 2

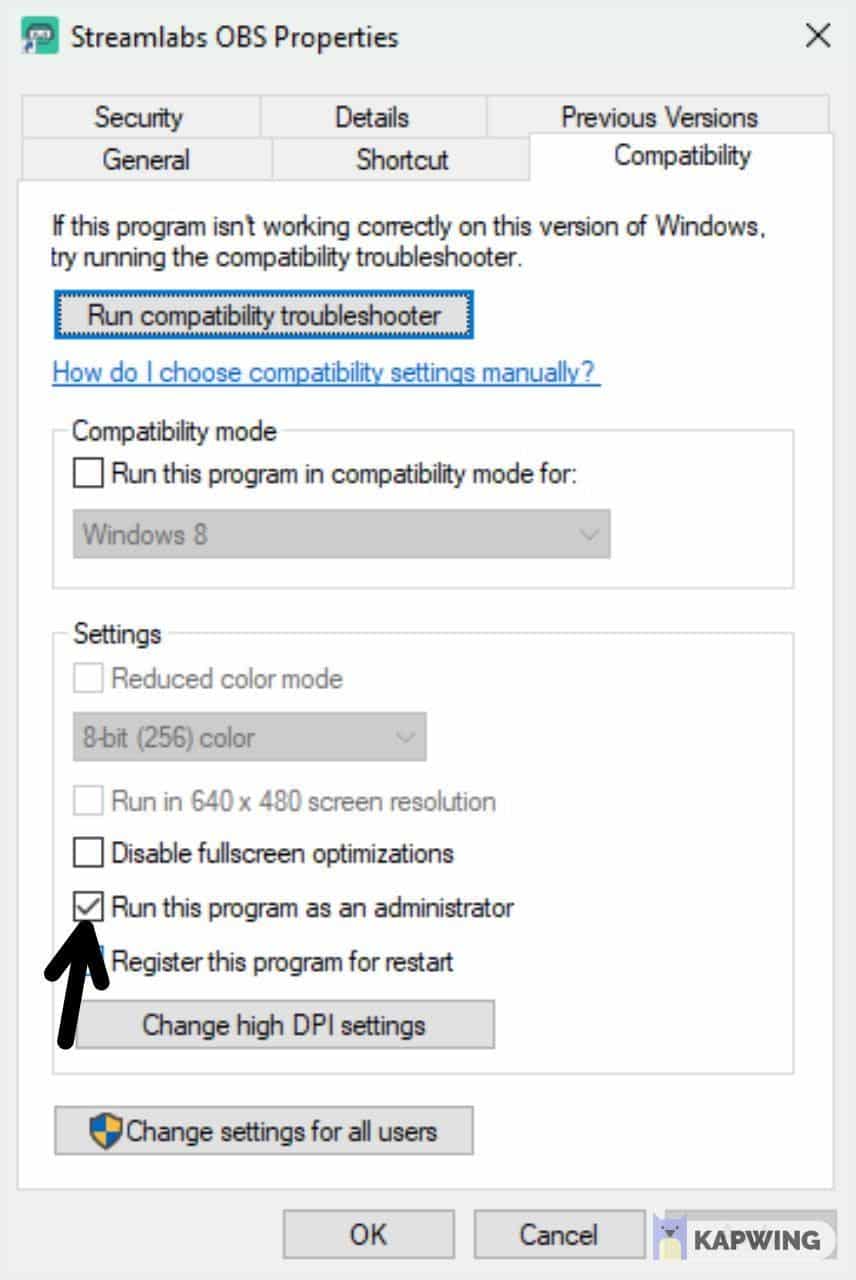
Select the “Compatibility” tab located on the top and check the box labeled “Run this program as administrator.”
-
Step 3
Click “Apply” and “Ok” at the bottom and restart Streamlabs.
4. Run Streamlabs with your Integrated Graphics Card
Make sure that you uncheck “Run this program as an administrator” from the last step. If this is not unchecked, then you will receive an error when attempting this step.
This option also may not populate if you do not have a graphics card integrated into your motherboard.
-
Step 1
Right-click on the shortcut you created for Streamlabs on your desktop.
-
Step 2
Click “Run with Graphics Processor” and select the “Integrated Graphics.”
If this is your issue, keep in mind that you will have to start Streamlabs every time by following this solution.
5. Running Streamlabs with Integrated Graphics Card (Gaming Laptops using NVIDIA)
This solution is mainly for Gaming Laptops and Laptops in general. It may not work for your desktop PC so use this solution at your own risk if you are using a PC. Again, you will have to run Streamlabs every time by right-clicking and selecting to run the program with the integrated graphics card.
-
Step 1
Right-click on an empty space on your desktop and click on the “NVIDIA Control Panel.”
-
Step 2
Click on “Manage 3D Settings” and select “Program Settings.”
-
Step 3
In the “Select a Program to Customize”, select Streamlabs.
-
Step 4
Under “Select the Preferred Graphics Processor for this Program” click the dropdown menu and select “Integrated Graphics.”
-
Step 5
Select “Apply”, it may take a second to update.
Again be warned if using this on a PC and not a laptop, there is a likelihood this will not work.
How to Fix Game Capture Black Screen on Streamlabs
If none of the solutions below resolve the issue, I recommend switching to a display capture source instead of a game capture source if possible. Make sure all drivers are updated before starting any solution steps listed below.
Otherwise, it could be due to one of the following three issues:
1. Looking for a Game to Capture
If presented with this screen after adding a Game Capture source, these easy steps listed below should fix your display in no time:
-
Step 1
If you have a Game Capture source added delete it and Open the game you want to capture.
-
Step 2
Re-add the Game Capture source.
-
Step 3

Now with the game you want to capture opened, change the “Mode” to “Capture Specific Window”; and change the “Window” to the game you want to capture.
-
Step 4

Make sure to layer your sources properly. For example, make sure that your webcam, alert box, and any other sources you want to be displayed are on TOP of your game capture.
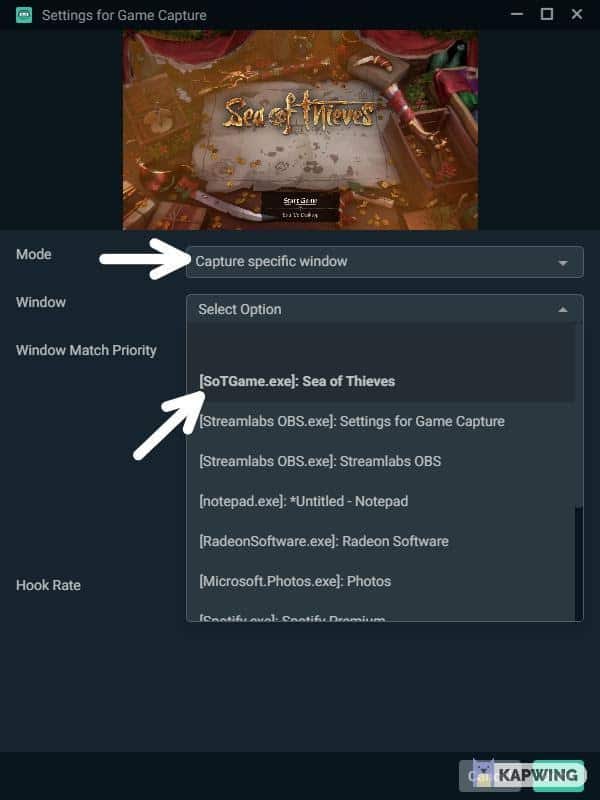

You will have to change the “Window” for each game you decide to stream, as it only saves on the game that you selected. You could create multiple game captures, and mute them depending on the game that you are playing by clicking the eye symbol next to the game capture source. (Shown above in, #1 Make sure you have a Display Capture Source Added to your Overlay.)
2. Run Streamlabs OBS as administrator
Just like for the display capture solutions, make sure that you have Streamlabs OBS running as administrator.
-
Step 1
Right Click on the shortcut you created for Streamlabs on your desktop and select “Properties.”
-
Step 2

Select the “Compatibility” tab located on the top and check the box labeled “Run this program as administrator.”
-
Step 3
Click “Apply” and “Ok” at the bottom and restart Streamlabs.
3. Graphic Settings/Graphic Performance Preference
Now this one is a bit more complex in comparison to the last solutions given. This will involve sifting through files to attain access to specific applications. As in all the previous solutions, follow the steps laid out as best as possible:
-
Step 1
Access your windows settings located on the bottom left of your desktop. Once in settings navigate to the “Display Settings.”
-
Step 2
Once in the Display Settings, scroll down to the bottom and select “Graphics Settings”. Make sure the app preference is set to “Desktop App.”
-
Step 3

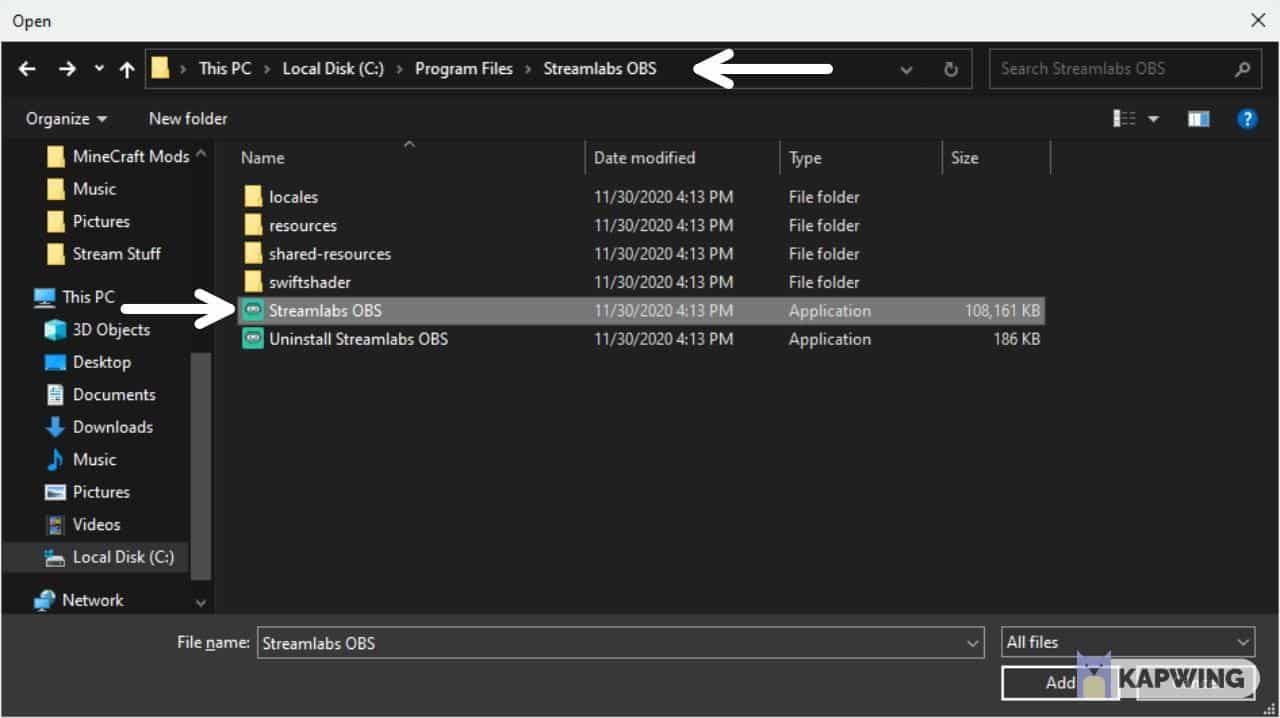
Select “Browse” and find the “Streamlabs application”, typically this is found in one of your drivers in a file labeled “Program Files.” The application itself is found in the “Streamlabs OBS” file. Once the file is opened add the “Streamlabs OBS” application.
-
Step 4
After adding the application, there will be an options button below it, Click on “Options” and select “High Performance.”
-
Step 5
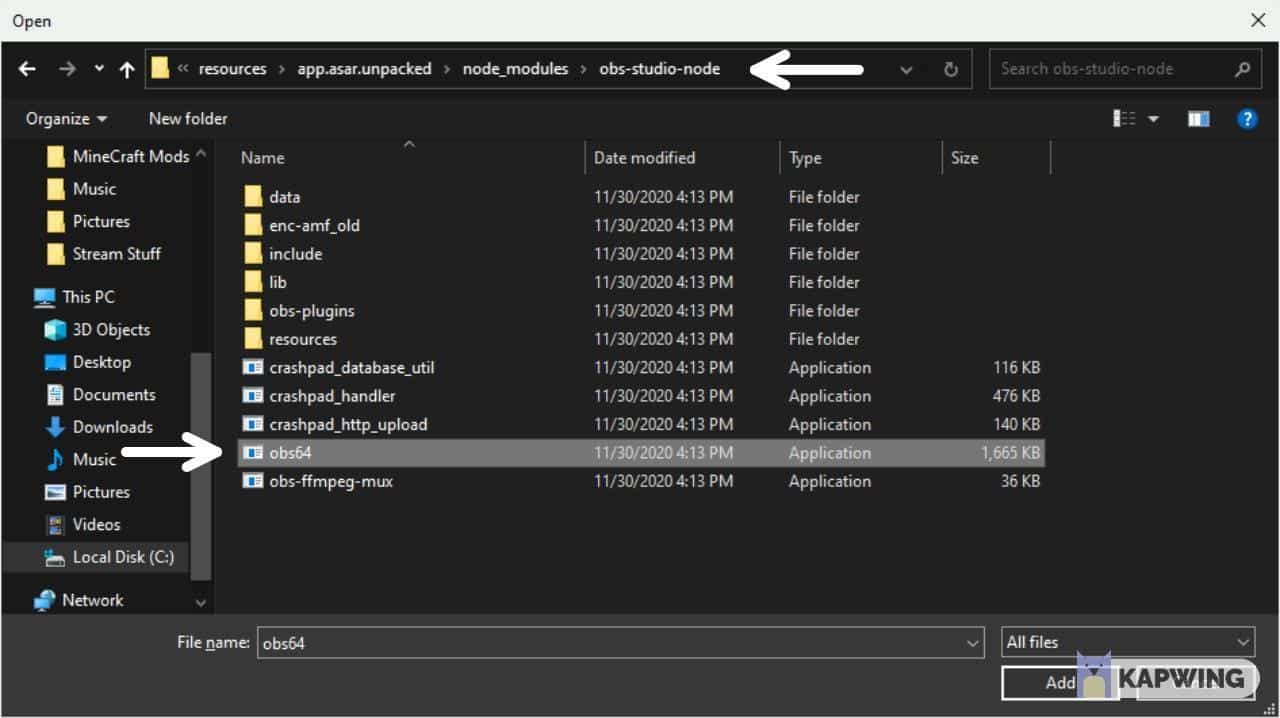
Now this time, follow Steps 1 through 3 but DO NOT add the Streamlabs application. Instead Click on the “Resources” folder, then select the folders titled “app.asar.unpacked”, “node_modules”, and finally “obs-studio-node.”

Add the Application “obs64” or it may be titled “obs64.exe.”
-
Step 6
Again, select the options below the newly added “obs64” or “obs64.exe” and select “High Performance” once again.
Strategies to Prevent Streamlabs Black Screen
When running Streamlabs with your integrated graphics card, make sure that every time you open Streamlabs it is by selecting the setting to use the integrated card. If you do not do this or forget to, the black screen will continue to occur no matter what you try. This of course, only applies to those who were able to fix the black screen error with the integrated card.
For game capture, if you are running different games, make sure you have a game capture source set up for each game. Otherwise, you will receive the “Looking for a Game to Capture” error, and be unable to see your game. Make sure you open the game you are wanting to stream before adding the game capture source, or else it will not appear in the “Window” drop-down menu.
For any type of capture source, if you have the eye symbol deactivated, it will not appear. You must activate the eye symbol in order to see your display or game. It can be located to the right of your sources. Make sure you also have all of your layers in the correct order, with your webcam, alert box, vertical support, etc. on top of the display/game capture when looking at the source box.
Conclusion
Technical difficulties plague streamers and digital users every day, with seemingly endless possible solutions that are too complex for most to understand or take up too much time. For a streamer, not being able to showcase the fun times and experiences they have with their audience can be detrimental. Now, technical difficulties just got a bit more manageable.

Kurt
Forever an avid techie, Kurt (aka Physek on Twitch) is a Software Engineer by day and a streamer/content creator by night. These days, he mostly streams Mario while talking about life, technology, and especially cats.