If you are serious about your streaming path, professional Twitch graphics are essential for drawing in new viewers and keeping them on your channel. The truth is, that production value plays a big part in whether or not a streamer is able to make affiliate or partner status.
While OBS has been considered the industry standard for years, since its launch, Streamlabs has continually improved to become the most widely used stream software. It’s easy setup and simple UI make it much easier for new streamers to integrate the features they need to go live.
Not only is Streamlabs free, but they also have a free cloudbot that will let you create games for your viewers, set up Streamlabs mod commands and manage giveaways and song lists.
What is a Full Stream Package?
A full stream package gives you everything you need to create a polished stream for Twitch or YouTube Gaming. The packages include overlays, widgets, stingers, and multiple layouts and scenes. The packages are customizable, allowing you to make multiple changes easily within Streamlabs.
When purchasing a full stream package, you can choose whether or not to include the After Effects source files. If you have an understanding of After Effects and want to make changes to the source files, this may be a good option. However, most users can choose the basic full stream package and still have great results.
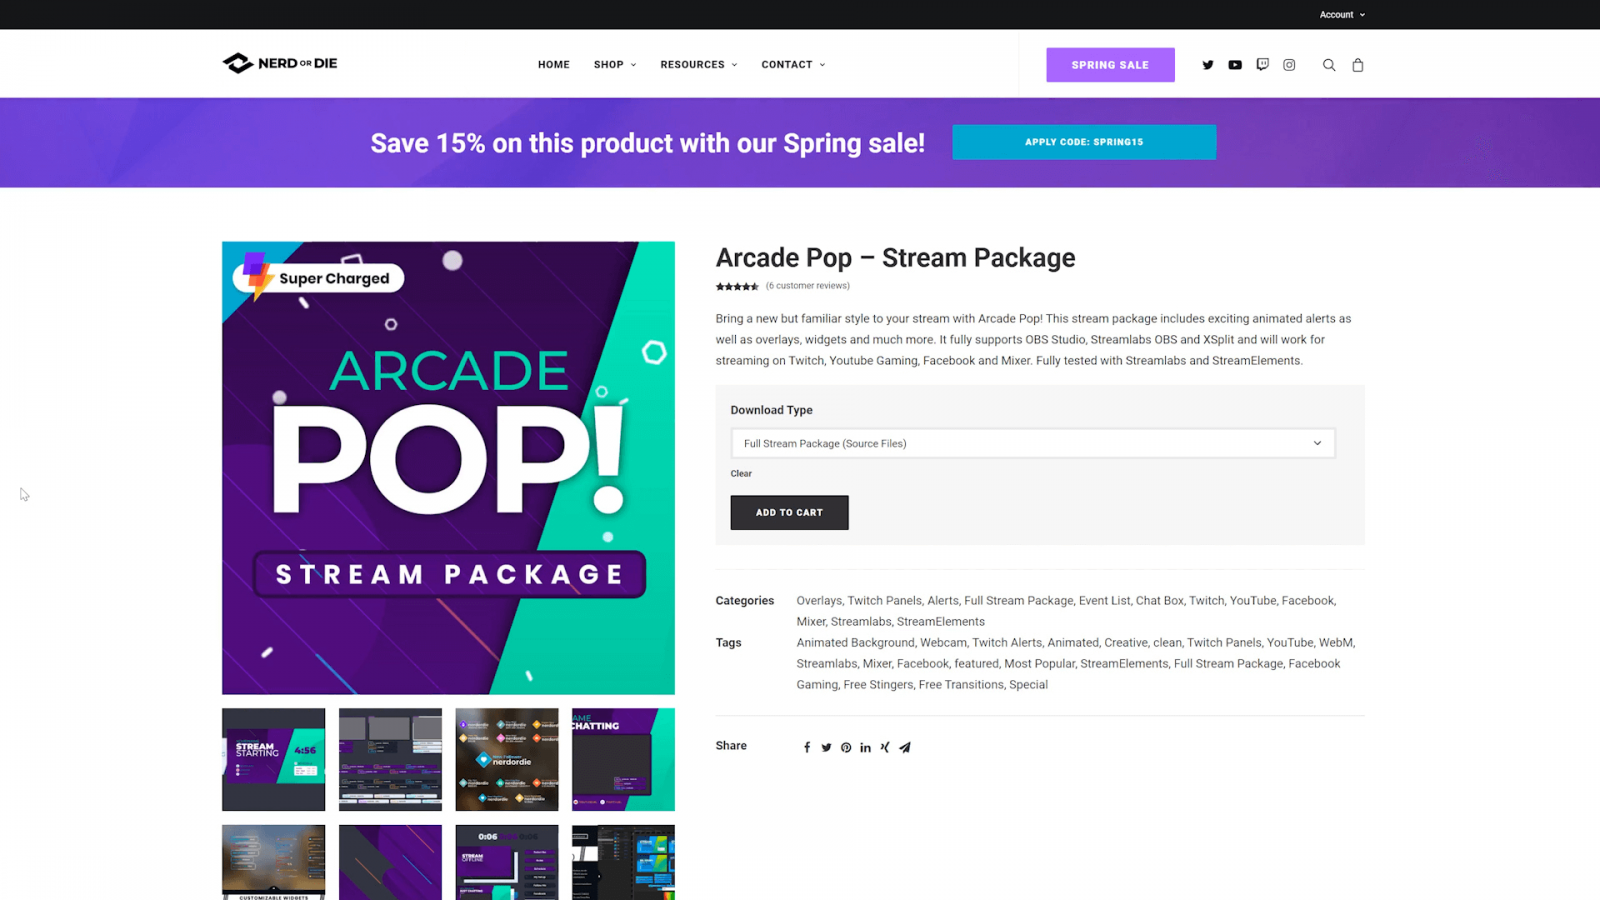
For this article, we’ll be using the Nerd or Die Arcade Pop package, which is the one that I use on my channel. I’ll start by walking you through the process of how to purchase the pack. The process should be similar for any pack that you purchase from any site.
How to Import Overlays in Streamlabs
This article will fully explain the following:
1. Make or Purchase a Package
The package we use in this example was created by Nerd or Die. There is an easy purchase process when it comes to buying your own graphics pack from Nerd or Die. All you need to do is complete the following:
-
Step 1
Hover over the “Shop” button at the top of the screen, and pick “Full Stream Package” from the drop-down menu.
-
Step 2
Go through the selection and pick out the design that you like best.
-
Step 3
Choose “Full Stream Package” or “Full Stream Package (Source Files)” from the “Download Type” menu, then click the “Add to Cart” button.
-
Step 4
Your cart will appear on the side of the screen. You can choose to checkout or continue shopping.
-
Step 5
When you are satisfied with your order, visit your cart and fill in your billing details and credit card/PayPal information. Process the payment.
2. Prepare to Install Your Package
Setting up your overlay package for the first time can seem daunting, but we’ll walk you through each step so that your channel will have a professional feel when you go live.
First, you will need to prepare your Streamlabs by creating a new scene unless you have a clear screen already. To do this, complete the following:
-
Step 1
Click “Scenes” on the lower-left hand side of the screen, then click “Manage all.”
-
Step 2
After the pop-up box appears, you will click “Create New” from the provided box.
-
Step 3
To rename the scene, return to “Manage all” and replace the scene name. Click “Done” when you are finished.
3. Install the Overlay Pack

After purchasing your stream package, you’ll need to download it to your computer. You should be given three zip files containing your alerts, extras, and overlays. Extract each to the same location to be given three folders.
To install an overlay, you will need to complete the following:
-
Step 1
From within Streamlabs, you will need to click the settings button (the cog) in the lower left-hand side of the screen.
-
Step 2
Choose “Scene Collections” from the options on the pop-up window. Click on “Import Overlay File.”
-
Step 3
Navigate to the Overlay file by going into the Overlay file, then the “Streamlabs Quick Install” folder. Choose the overlay of your choice from the list, then click the “Open” button.
-
Step 4
Delete the welcome screen to reduce the amount of CPU your computer will need to use while streaming.
4. Edit The Overlay
You will be able to edit some basic features about your overlay pack. This will include sine if the text, text colors, layouts, your socials, and your schedule. Click on the screen you want to edit. You will see that under the “Sources” section, you will be given several options.
The following is how you will be able to change several of the options:
-
Step 1
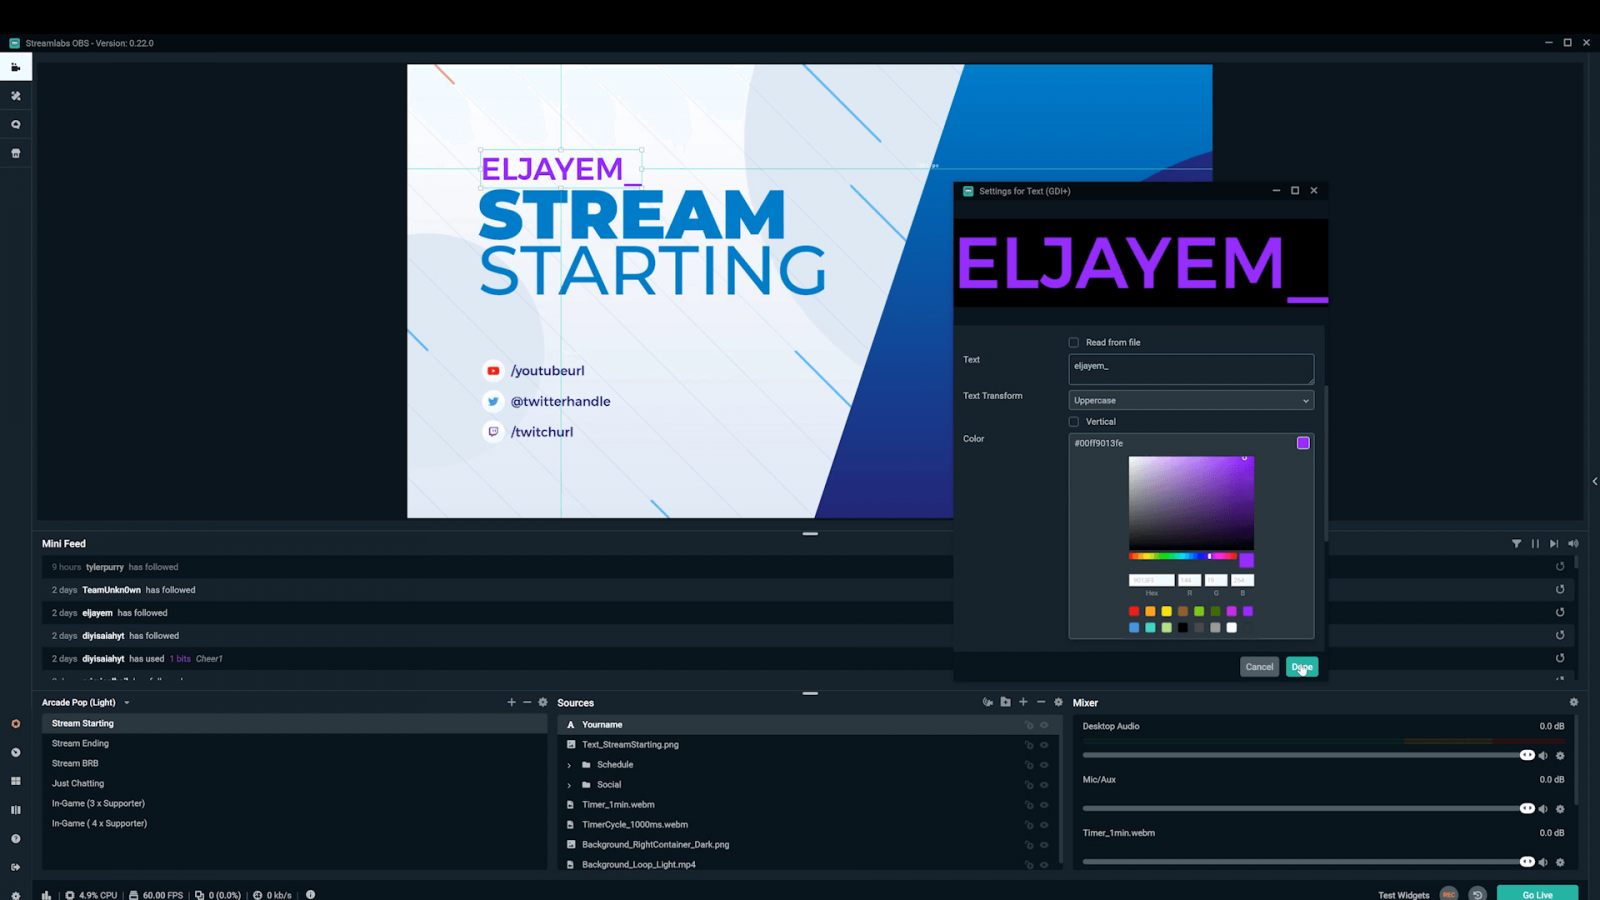
Double-click on “Yourname” under the sources section to open up the settings options.
-
Step 2
Under the text option, you can replace “Yourname” with your Twitch username. You can also change the text-transform to uppercase, lowercase, or none depending on your personal preference.
-
Step 3
To change the color of your name, you can click on “Color” and change the color to anything that you choose. You can also add a gradient to your name by clicking the checkbox and choosing a gradient color.
-
Step 4
You can also change your alignment to vertical and move your name template to another location on the screen.
To change your schedule or your socials, you will follow the same sets. Double-click on each section and edit the text, colors, and information to what you need. You may also want to add an alert box in case someone donates to you or follows you while you are on your starting or ending screen.
You will need to change your username, socials, and other information on every scene they are shown (such as the ending screen). Keep track of the colors and font styles you use on one so that you can maintain consistency on every page.
5. Set up In-Game Supporter Bars
Many of the Nerd or Die packs will give you the option to have a 3x or 4x supporter bar. This simply will allow you to have either 3 or 4 overlays at the bottom of your screen where you can celebrate your recent or top donators, subscribers, and followers.
While many streamers show their top supporters, when you are just starting out, showing your latest followers, subscribers, bit donators, and PayPal donators is a great way to make sure that everyone in your chat is included and celebrated.
To edit your support bars, complete the following:
-
Step 1
Open one of the supporter folders (either horizontal or vertical) in the in-game folder.
-
Step 2
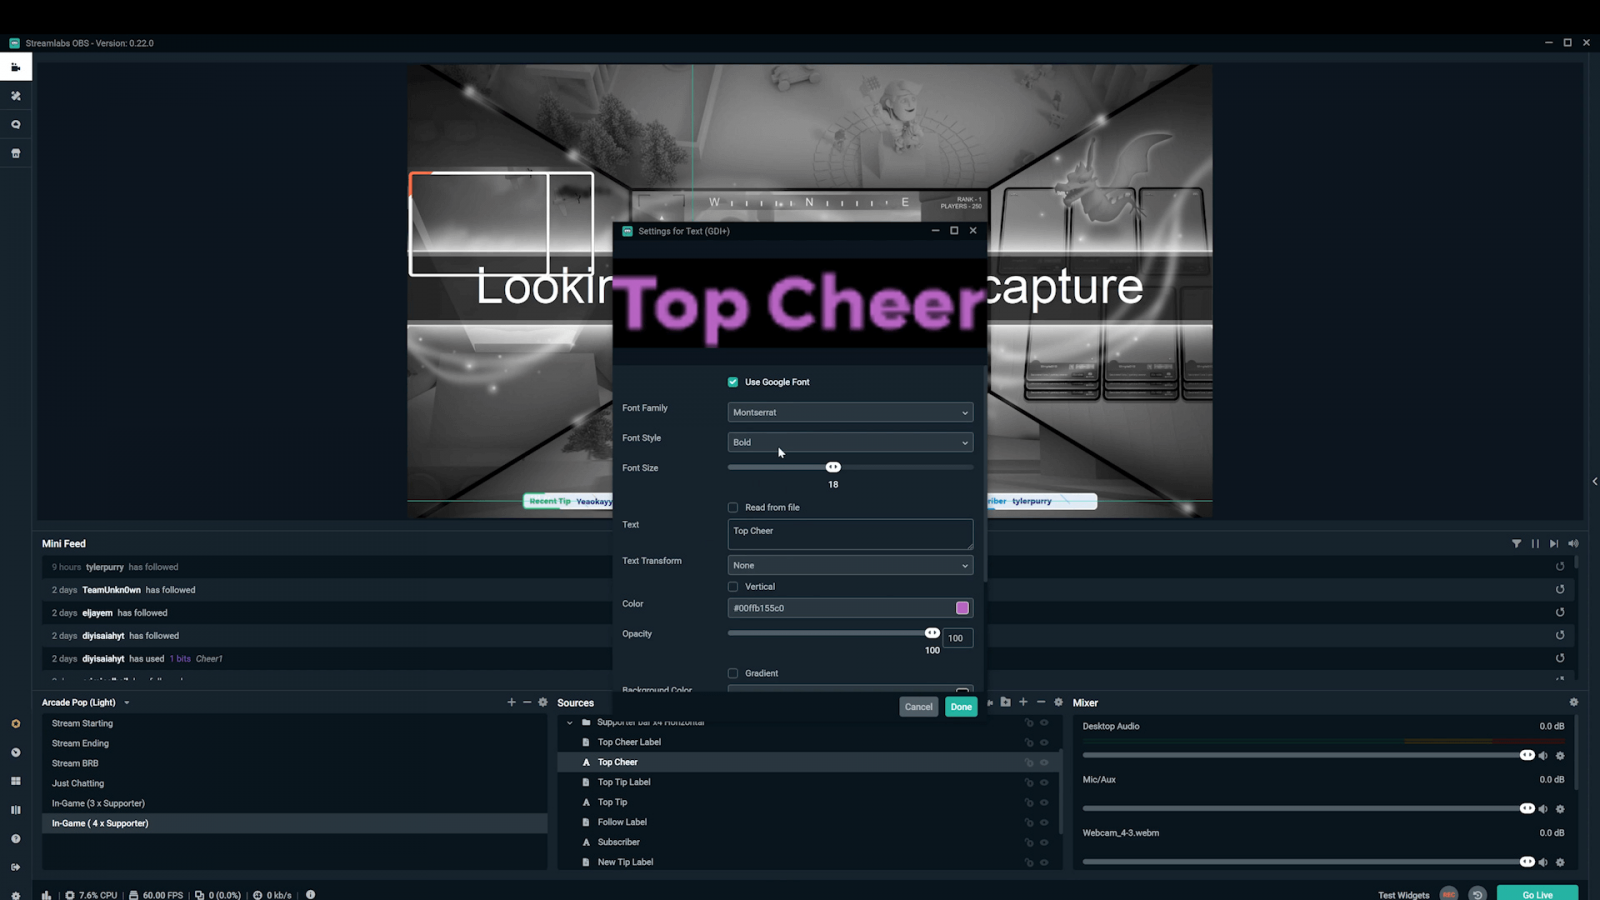
Double-click on the label you wish to edit (i.e. “Top Tip”).
-
Step 3
Change the text to your desired label (i.e. “Recent Tip”). You can also change the color of the text and the font if you wish.
-
Step 4
Under label type, choose (or search for) the label you wish to display (such as your most recent donation).
You can also choose between having your supporter bars be horizontal or vertical. You will need to set up both sets of bars if you wish to use both. Setting up one won’t update the other. You can also choose to use both sets if you want to show 8 different metrics.
6. Install Alerts
To set up an alert box, you will need to do the following:
-
Step 1
Click the “+” button above the sources section, then choose the “Alert box” widget on the pop-up window. Click the “Add Source” button.
-
Step 2
Rename the alert box if you wish. Click the “Add Source” button.
-
Step 3
Position the alert box to your desired location on the screen.
-
Step 4
Double-tap the alert box in the sources section to open up the options.
-
Step 5
On your computer, open the alerts folder that you downloaded from Nerd or Die.
-
Step 6
Open the Streamlabs folder from inside the alerts folder and double-click on the weblink to go to the right page on your Streamlabs dashboard.
-
Step 7
Click “Create a New Widget” and name it whatever you wish (such as “XYZ”). Click the “Create” button.
-
Step 8
Choose “XYZ” (or whatever you named it) from the widget theme options.
-
Step 9
Return to Streamlabs and test your widget to ensure that it works properly.
7. Install an Event List
-
Step 1
From your computer, open the Overlay folder you received from Nerd or Die, then go into the Streamlabs folder.
-
Step 2
Double click on the Event List weblink to go the Streamlabs dashboard.
-
Step 3
Click “Create a New Widget” then click the “Create” button.
-
Step 4
Choose “XYZ” (or whatever you named it in the Install Alerts section) from the widget theme options.
-
Step 5
Return to Streamlabs and move the Event List to your desired location on the screen.
-
Step 6
Double-click on the event list in your source section to choose which events you wish to show during your stream.
8. Install Custom Twitch Chat
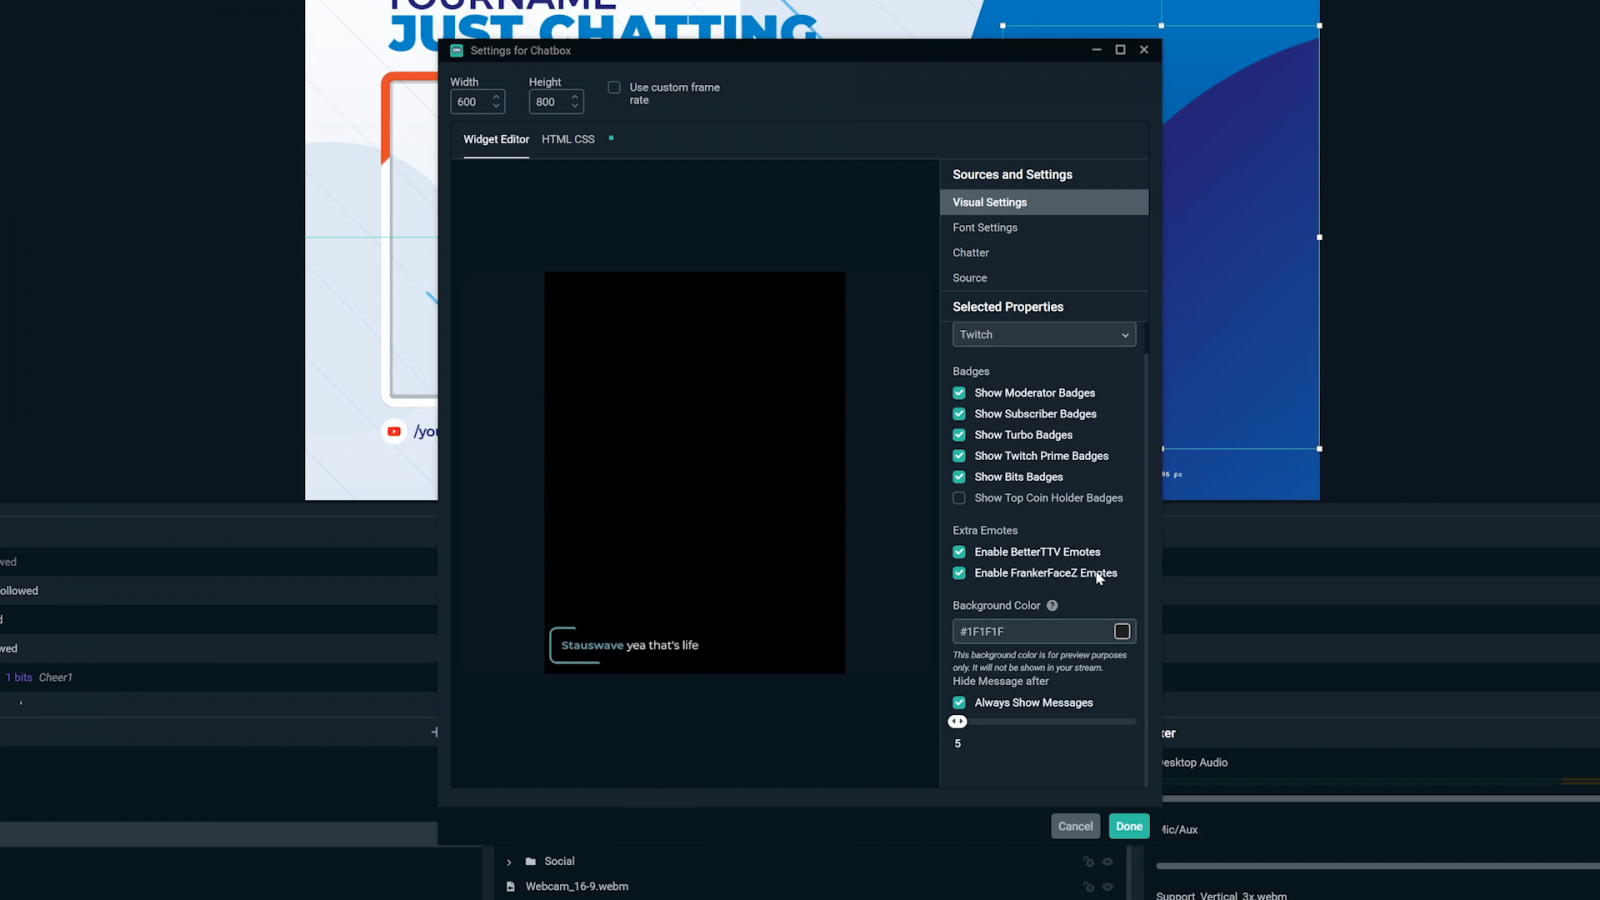
To install an event list, open to your “Just Chatting” screen, then complete the following:
-
Step 1
From your computer, open the Overlay folder you received from Nerd or Die, then go into the Streamlabs folder.
-
Step 2
Double click on the Chatbox weblink to go the Streamlabs dashboard.
-
Step 3
Click “Create a New Widget” and then click the “Create” button.
-
Step 4
Choose “XYZ” (or whatever you named it in the Install Alerts section) from the widget theme options.
-
Step 5
Return to Streamlabs and move the Chatbox to your desired location on the screen.
-
Step 6
Double-click on “Chatbox” in your sources to edit settings such as showing badges, changing your background color, and showing BTTV or FrankerFaceZ emotes.
Webcam Aspect Ratios
There are two common aspect ratios that come with the Nerd or Die packs. These are the 4:3 and 16:9 aspect ratios. The 16:9 will be longer than the 4:3. You can choose one to your personal preference. You can also remove the webcam overlay if you have a green screen and are planning to just remove your background fully.
Conclusion
A full graphics pack is a great way to enhance your content before reaching out to pursue networking opportunities or hosting other streamers on Twitch.
Eljayem
Eljayem_, is a Twitch Partner with a background in video production. He is passionate about combining his love for video with community building. He’s been playing video games since he was old enough to steal his Brothers GameBoy Colour, copy of Pokemon Blue, and accidentally waste his Master Ball on a Dratini.