When you are on a previous version of OBS studio, you may not have the access you need to other OBS plugins. Checking frequently for available updates will allow you to get the most out of the system so that you can focus on creating better content for your audience.
Here is how you can update OBS studio to the latest version:
How to Update OBS
-
Step 1: Check for updates within OBS.
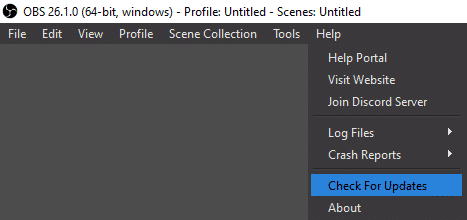
Navigate to the Help tab on the bar at the top of the screen, and press, “Check For Updates.” This will check if there have been any updates to OBS for you. It’s a good idea to do this every week or so when you’re not planning to stream or record right away, as updates to OBS are frequent.
-
Step 2: Decide if you want to update.
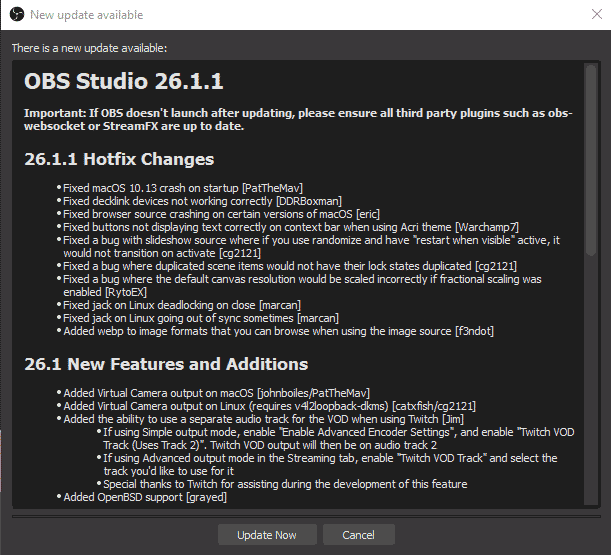
If a new update is available, a pop-up window will appear with the new version number and a list of changes that will be made during the update. If you are happy to update then click the “Update Now” button at the bottom of the window. Else, just hit “Cancel,” and you can do the update another time.
Alternatively, if the button in OBS itself isn’t working for you or you want to do a clean install, the OBS website will have the latest installer for your operating system available here: https://obsproject.com/download
Once you’ve got the newest installer, run the install to the location that you had installed OBS previously following the exact same steps as you did when first installing OBS. This will overwrite the old version you had and bring you up-to-date.
-
Step 3: Allow OBS to make changes.
After pressing “Update Now” your operating system may prompt you to give OBS permission to make changes to your computer. Once you grant these permissions, the update will begin. OBS will perform a final check for the update and then make the necessary changes.
As soon as the update is complete, you should try to launch OBS to ensure that the update has completed successfully. Once the software opens, you can double check that everything is working as expected and use it as normal.
If you have any plugins installed for OBS, these will need to be updated separately after you update OBS and may not work otherwise. When using plugins, it may be wise to wait until their creators have released a compatible version before starting the new OBS update.
When to Update OBS
There are a few ways that you can check if you need to update OBS:
- Go to the OBS Studio website and check if the version number on the website’s front page matches the one in OBS in the top left corner of the window. This will let you know if you have a previous version of OBS Studio.
- Use the “Check for Updates” button in the Help tab of OBS.
- If you enable the “Automatically check for updates on startup” option in your OBS settings under the general tab, every time you open OBS it will tell you if there is an update available. This can be especially useful if you don’t want to spend time remembering to check for updates and would prefer to be prompted.

Of course, you don’t have to update OBS as soon as an update is available – there is the option to have OBS remind you later, to cancel an update, or to skip a version. It can be useful to wait until later to update if you’ve opened OBS to immediately start working or are happy with the version you’re on- there’s no need to put your content at risk.
Reasons to Update OBS
There are several reasons you may want to update OBS. Each update has a long list of hotfixes, new features, and optimizations. Each update may resolve an error you were running into, offer new ways to use OBS, or make the program less intensive on your PC while recording or streaming.
Of course, each time you update, you don’t need to check over each line in the notes – but it could be worthwhile if there’s a particular feature you’re hoping for.
Frequently Asked Questions
Conclusion
Once you learn how to use the OBS updater, you’ll be able to update your program files to the current version easily. Taking the time to make sure you have the current version can allow you to stream at a higher quality.

Emrys
Emrys is a games development student and Twitch streamer from the UK. In his streams, he shares his love for video games and their craft. Outside of streaming, he loves gaming with his partner.


