Note: A common plugin that is used in conjunction with Voicemeeter is the VB-Cable driver. VB-Cable adds a virtual audio input and output that can be configured to what the user needs. Due to it being used with Voicemeeter so often I have included steps for uninstalling the plugin as well. If you do not have VB-Cable installed you can skip these steps.
How to Uninstall and Remove Voicemeeter
Using Windows 10’s App Removal
-
Step 1
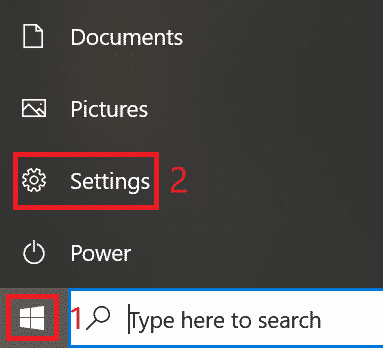
Press the Start button (1) then click Settings (2)
-
Step 2
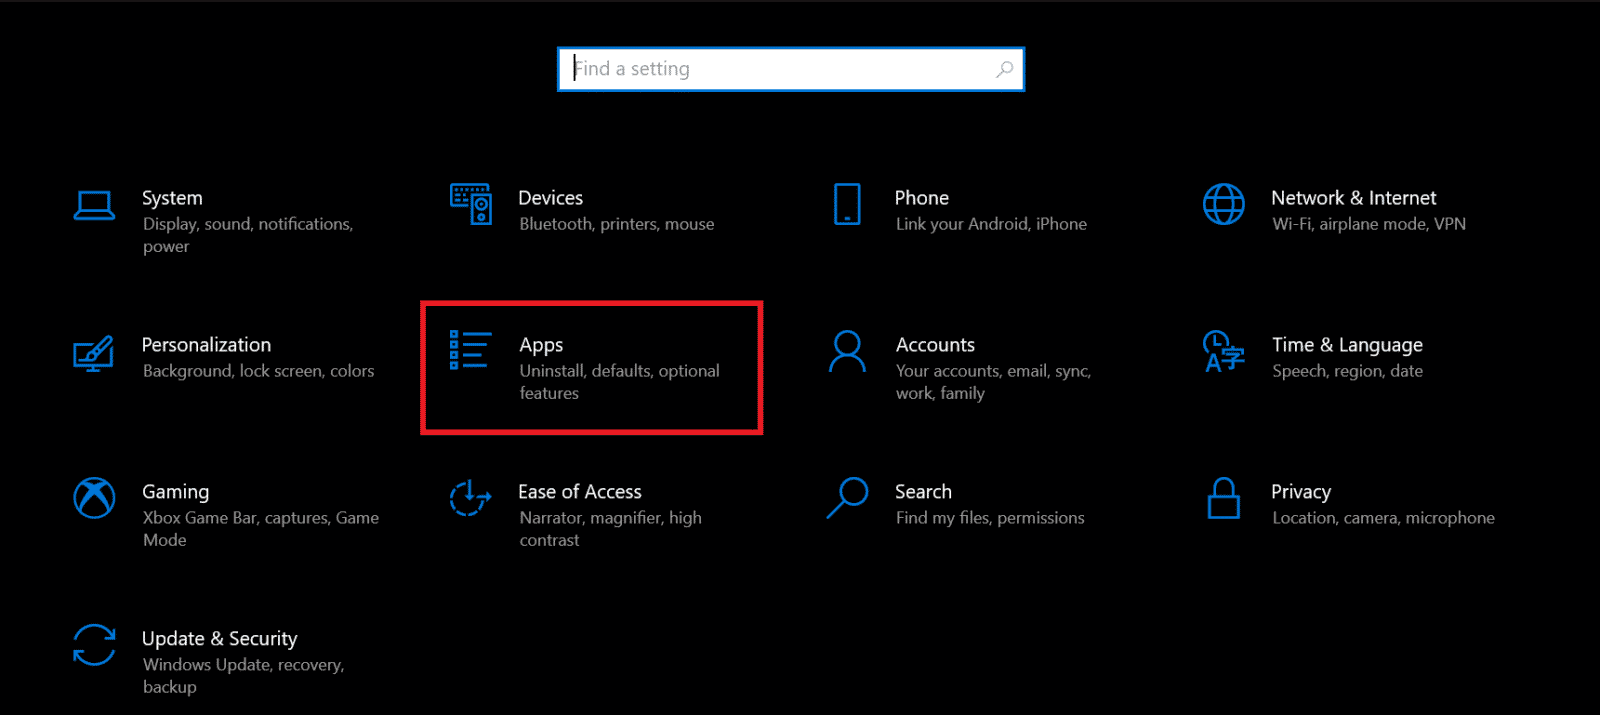
Select “Apps” from the available options.
-
Step 3
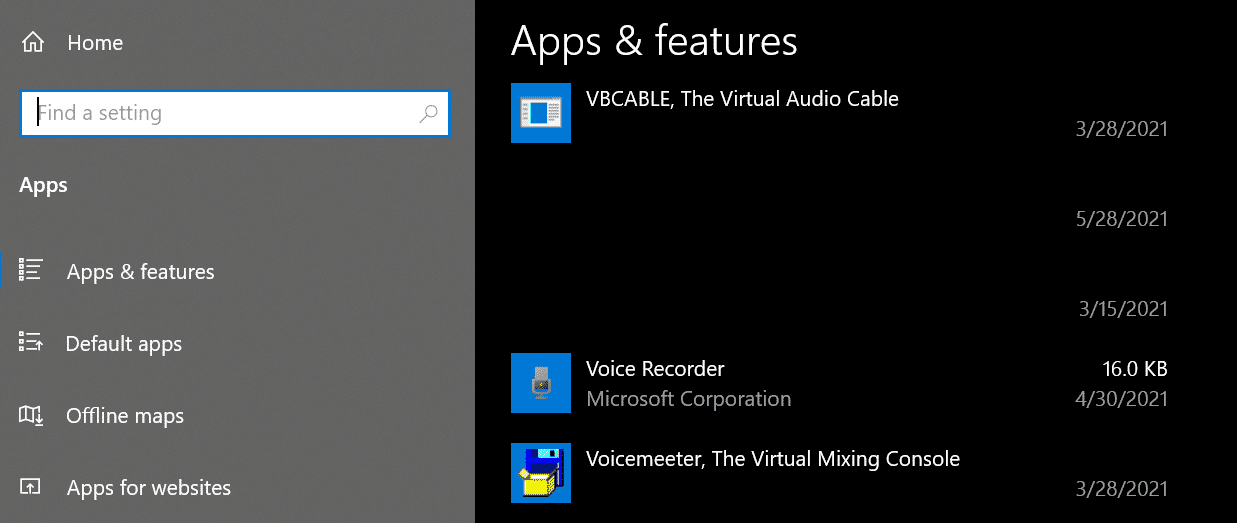
From the list of apps scroll down to where you see Voicemeeter and VB-Cable.
-
Step 4
Let’s start with uninstalling VB-Cable. Select VB-Cable from the Apps list, press Uninstall, then Uninstall again on the popup.
-
Step 5
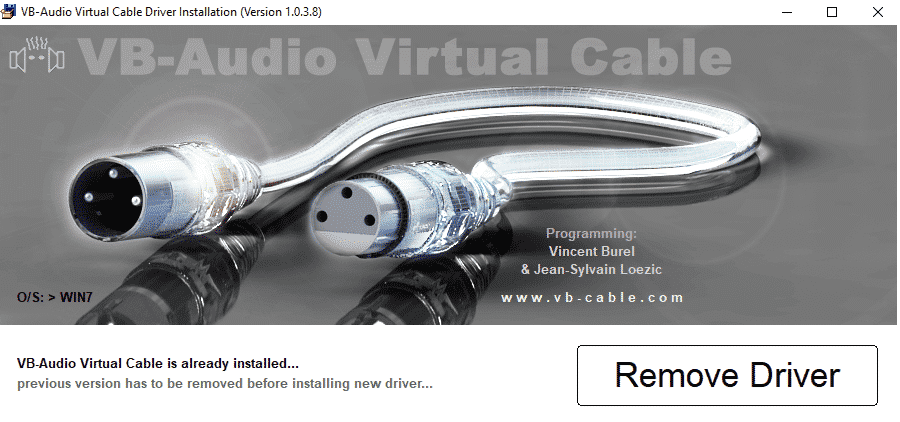
Another window will open, click the “Remove Driver”. Very quickly another window box should open saying the uninstall was successful and to restart to complete it.
-
Step 6
Restart your computer. Until the computer is restarted the VB-Cable inputs will continue to appear installed.
-
Step 7
Repeat steps 1 through 3, selecting Voicemeeter then Uninstall this time.
-
Step 8
In the window that opens, click “Remove”, then OK on the uninstallation success message.
-
Step 9
Once again restart your computer. Once your computer is back up Voicemeeter should be uninstalled.
Using the original Installers
Another option for uninstallation, particularly if you cannot locate the Voicemeeter options on your Apps list, is to use the original installers.
If you no longer have the installers you can download them from here https://vb-audio.com/Voicemeeter/
-
Step 1
Make sure you download the version you have installed, either standard Voicemeeter, Banana, or Potato. If you aren’t sure which version you have you can open Voicemeeter and it will display it at the top left.
Voicemeeter standard
Banana
Potato
Once you have identified the version you have, download the installer for it onto your computer.
-
Step 2
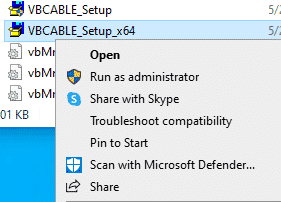
Next, you will need to run the installer, making sure to right-click and run as administrator when you do.
-
Step 3
You will see the window popup for Voicemeeter, which should have the “Remove” option. Click Remove and you should get a popup saying the removal was successful and to restart to complete it.
-
Step 4
Restart your computer and verify Voicemeeter has been removed.
Note: This same process will need to be done for VB-Cable if you have that installed as well.
Manually Uninstalling Inputs/Outputs Using Device Manager
If the previous methods have failed to remove all traces of the Voicemeeter devices the last method is to attempt to remove the remaining devices using Device Manager.
-
Step 1
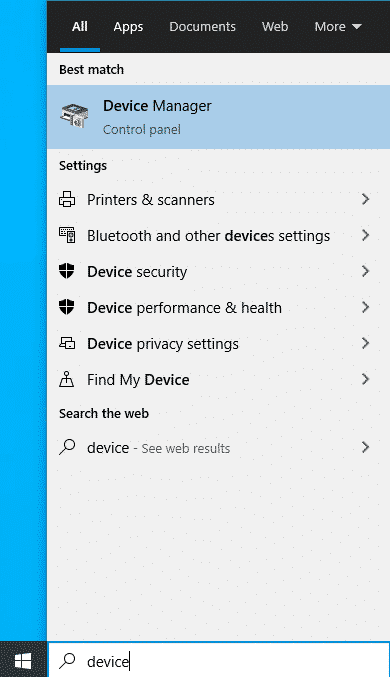
In the taskbar search bar type “Device Manager”
-
Step 2
Click on Device Manager.
-
Step 3
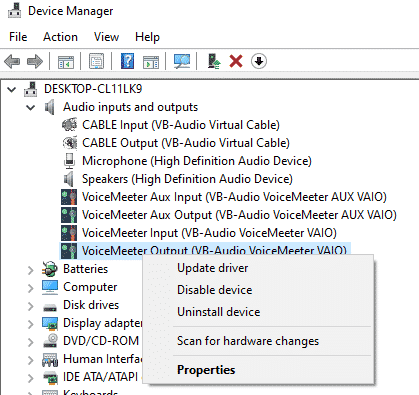
The Device Manager will open in a new window. Click on the arrow next to “Audio Inputs and Outputs” to see a complete list of devices.
-
Step 4
Here you can right-click and uninstall each of the Voicemeeter (and VB-Cable) inputs/outputs you see.
-
Step 5
Once these are removed you will need to restart your PC. Once restarted, open Device Manager and check to make sure all of the inputs/outputs are now gone.
Issues with Uninstalling Voicemeeter
If you have issues uninstalling Voicemeeter, usually in the form of the software still showing up after it should be uninstalled or virtual inputs still showing up under sound devices then hopefully the previously detailed steps should help resolve those issues.
However, in some cases, users have had audio issues occur after Voicemeeter is completely removed. This is most often due to old audio settings being broken due to the previous Voicemeeter inputs now being gone. In this case, it is best to revisit your audio devices and make sure your speakers/headset and Mic are set to be your default Playback and Recording devices (they should have the green checkmark like in the picture).
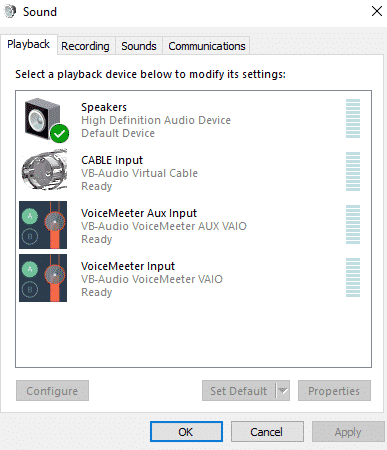
Make sure that any streaming or recording software you use with unique audio settings are adjusted as well.
How to Make Sure Voicemeeter is Uninstalled Completely
The fastest way to make sure Voicemeeter is uninstalled completely is to check your sounds settings. Once the software is uninstalled you will no longer see any Audio devices listed as “Voicemeeter Input/Output”. This can be done quickly by Right-clicking on the speaker icon of your taskbar then selecting “Sounds”.
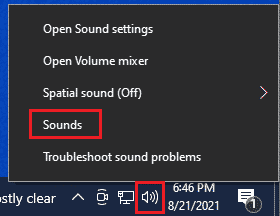
In the window that opens you will need to select the “Playback” and “Recording” tabs at the top. In each of these tabs, you can scroll through the list (yours will look different and include any mics, speakers, etc. you have attached to your computer) making sure you DO NOT see any labeled as Voicemeeter input/output like below.
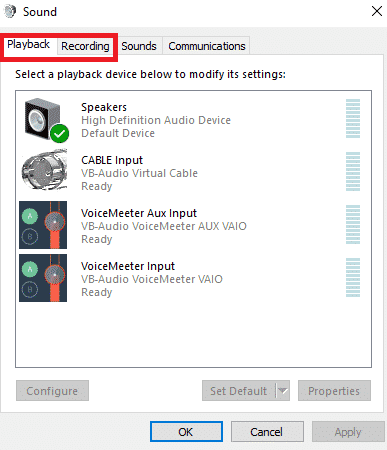
If the Voicemeeter devices are missing from your Sounds settings then it is fully uninstalled!
Conclusion
Once you take your time and make sure to install each of the components followed by a restart the process should go rather smoothly. Whatever the reason you had to uninstall Voicemeeter hopefully these steps helped you get it removed completely.

Marcus
Marcus is a Systems Engineer from The Bahamas with a love for gaming and writing. He is passionate about using his experience to help others get the most out of the technology they use.


