
Note: If you were searching for how to host on Twitch, we have forwarded our articles on hosting to this one as you can no longer use the traditional hosting feature.
This article will look at how you can suggest other Twitch streamers in your About Me, how you can edit your suggested Twitch streamers, and the benefits of suggesting streamers.
How to Add Recommended Channels on Twitch
You can add suggested streamers right on your profile page. They’ll appear at the bottom of the home tab, so once people have looked through your clips and past broadcasts, they can also see which streamers you recommend. So let’s start by looking at how to get those suggested streamers on your About Me.
-
Step 1
Head to twitch.tv and log in to your Twitch account.
-
Step 2

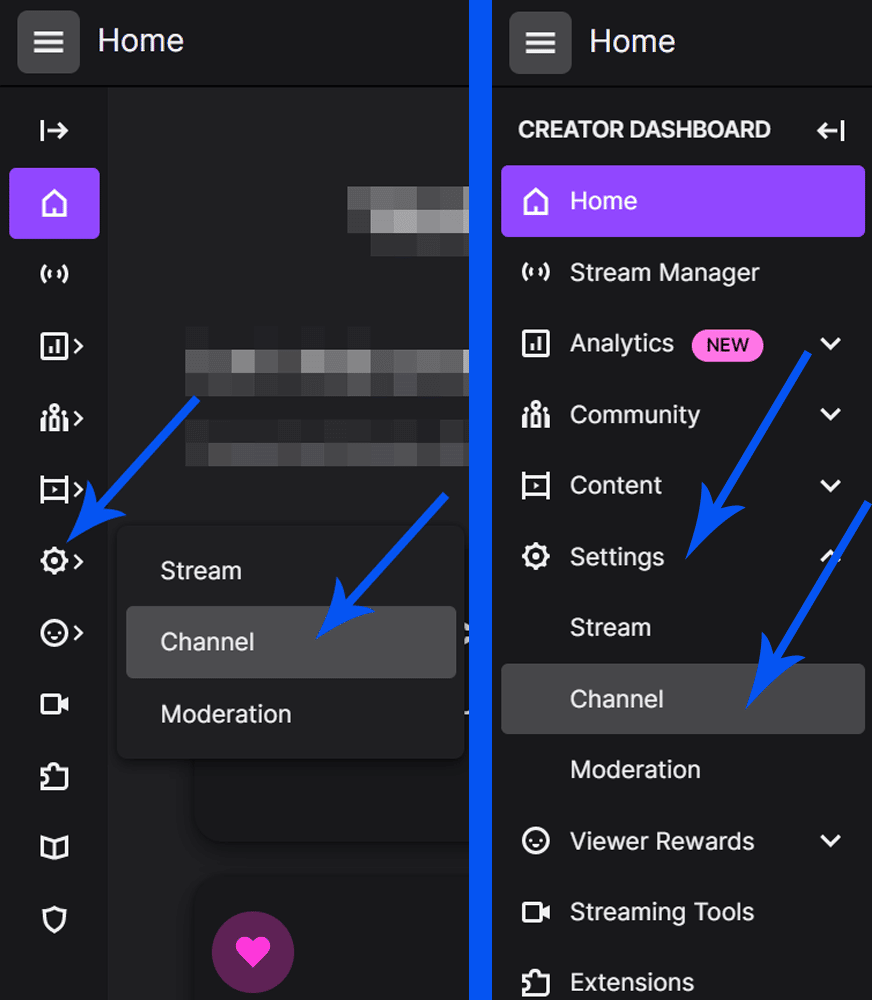
On the top right of the page, click on your profile picture and select the creator dashboard.
-
Step 3

On the Dashboard menu of your Twitch channel, select Settings. Then, from the drop-down menu, click on Channel.
-
Step 4

Click on the Featured content tab.
-
Step 5

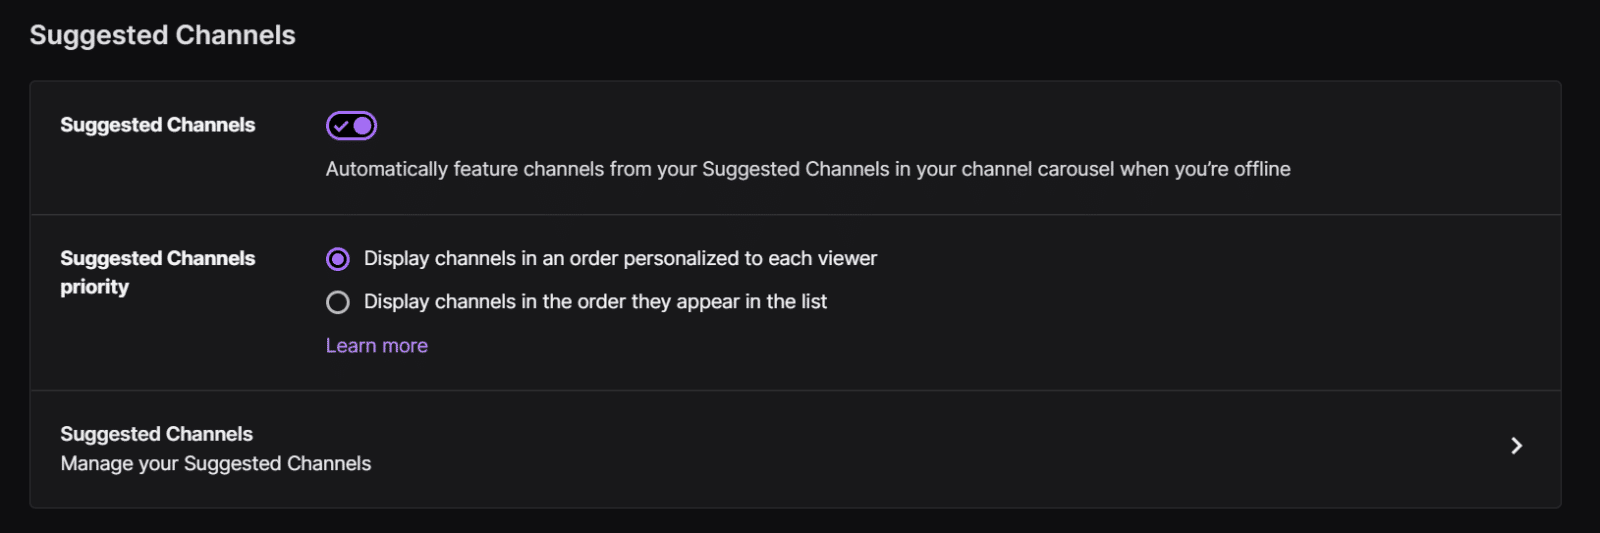
At the top of this page, you can see the Suggested Channels section.
By enabling this, your suggested streamers list will appear on your profile. Furthermore, they will also be featured in your channel page carousel whenever you’re offline.
You can also choose how your suggested list will appear on your channel page.
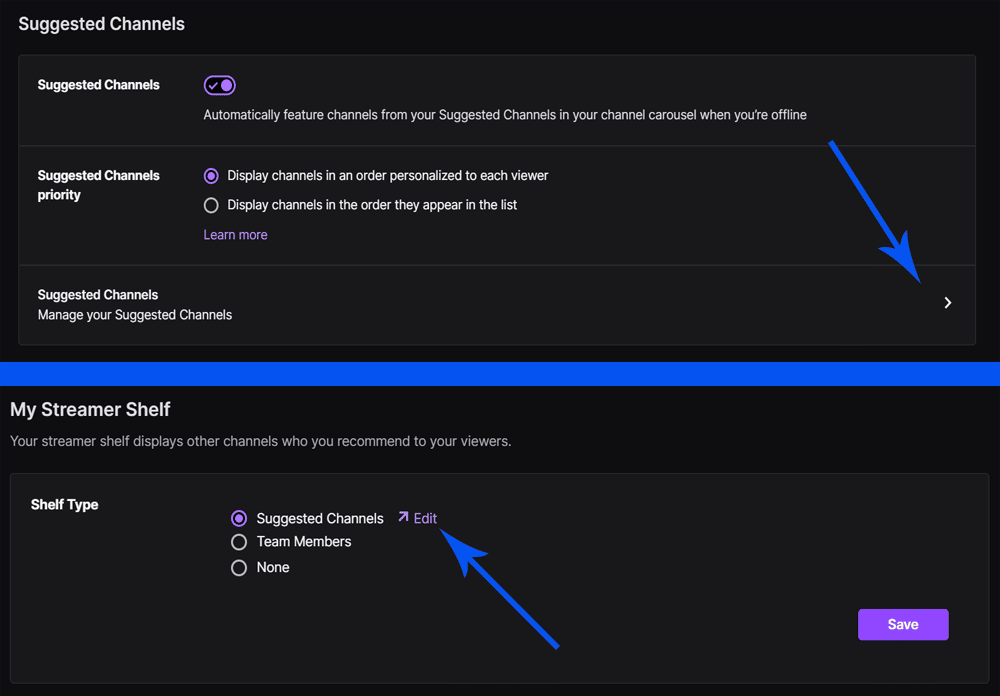
If you want to add or remove a streamer from your list, click the “Manage your Suggested Channels” option.


Alternatively, you can also scroll down to the bottom of the Featured content page. Here, you will find the “My Streamer Shelf” section.
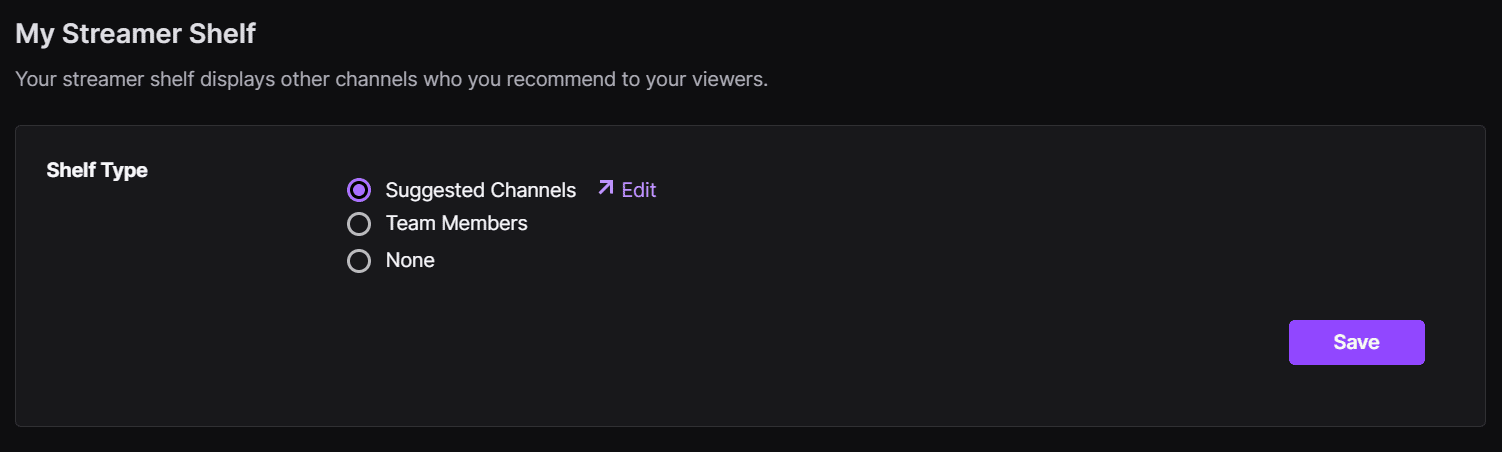
There are now three options available to you.
1. Suggested Channels
Here you can manually select which streamers you want to appear on your profile page. Great if you have particular streamers you want to recommend. You can add a few streamers to your list.
2. Team Members
Got a Twitch team? If you select this option you will automatically recommend members of any teams you are part of on Twitch.
You can also create a Twitch team as long as you are a current Twitch partner. However, there’s also a limit to how many teams you can form. For more info about Twitch teams, check out our guide here.
3. None
Maybe you don’t want to recommend other streamers. That’s ok! No one is making you doing anything you don’t want to.
Once you have selected the option you want to go with, click on the purple save button at the bottom right of the My Streamer Shelf box.
Now, if you head to your profile page and scroll to the bottom of the Home tab, you should see your suggested streamers!
How to Edit Your Twitch Suggested Streamers
Now that you’ve added a streamer or two to your About Me, how do you edit them?
-
Step 1
On your profile page, click on the Home tab.
-
Step 2

Scroll down to stream suggestions.
-
Step 3
Click on Edit suggested channels.
-
Step 4

On the Featured content tab, you can either click “Manage your Suggested Channels” in the Suggested Channels Section or the “Edit” button of Suggested Channels in the My Streamer Shelf. Either way, you will be redirected to the page where you can add or remove the Twitch channel.
-
Step 5
You can add, remove, or reorder streamers on your list.
-
Add a New Streamer

Click on the search bar and type in the name of a streamer. When you’ve found the streamer you want, click on the ADD button.
-
Remove a Streamer

On your host list, hover your mouse over the streamer you want to remove. They will be highlighted with a grey box. Click on the trash can, and they will be removed.
UPDATE: As of October 3, 2022, Twitch no longer supports the auto host list and, consequently, host mode. In place of the Twitch feature to host channels is “Suggested Channels.”
Why Did Twitch Get Rid of Auto Host Mode?
The function to add streamers to your channel page used to be the auto host feature. However, Twitch removed it recently. According to them, it didn’t match the viewers’ expectations and prevented Twitch users from interacting directly with the streamer when they were live, which could also affect the channel’s growth.
Similar to host mode, this feature lets you showcase channels you’d like to recommend to your viewers whenever your own channel is offline. The list of your suggested channels can be seen in your page’s carousel and at the bottom of your page. People watching your live streams can check them out while you are away.
Benefits of the Suggest Streamers Feature on Twitch
So why would you want to recommend other streamers on Twitch? There are many reasons, but here are a few:
-


-
Build a community
Have your community engage with other streamers and discover more people on Twitch, leading to growth on the platform. This can also lead to organic recommendations from your own community to others.
-
Networking
Suggesting other streamers allows you to reach out to others and create a connection. Let them know you want to recommend them to your own viewers as you enjoy their content. Most times, this will be reciprocated.
-
Trust
Build trust from your viewers with recommendations on streamers who you think they’d enjoy. That’ll make them much more likely to return to you for more suggestions.
Conclusion
Hopefully, this article has helped you learn how to suggest other streamers and the benefits of doing so. You can always easily update your suggestions, so if you meet other like-minded streamers you can add them to your list.

Rik
Rik is a Twitch streamer, podcaster, and comedian from the UK. As a stand up, he's performed all over the world, appeared on TV and on radio. His material and streaming is based around his interests in geek pop culture and his Scottish/Filipino heritage.