Twitch panels are graphics, extensions, and info that you add to your profile to explain to your viewers who you are and your channel. Most of the time, the term is used specifically for graphics. You can create your own Twitch panel designs or purchase a professionally designed set.
When you add text and images to your profile page, you are not only allowing your audience to enter your world a little more, but you are also showing potential sponsors that you are well-branded.
This post will cover how you can add Twitch panels to your Twitch channel page, how to set your channel apart from other content creators, and how to edit panels in the future.
How to Add Panels to Your Twitch Profile
Once you have designed your own custom Twitch panels (or found some you can customize), you will need to add them to your Twitch profile. Here’s how:
-
Step 1
Log in to your Twitch account.
-
Step 2
Click on your avatar on the top right-hand side of the screen and pick the “creator dashboard” from the drop-down menu.
-
Step 3

Click the “About” button on your channel page under your name and followers.
-
Step 4

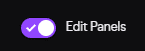
At the bottom of the screen, click the “Edit Panels” toggle to allow you to customize your about me section.
-
Step 5

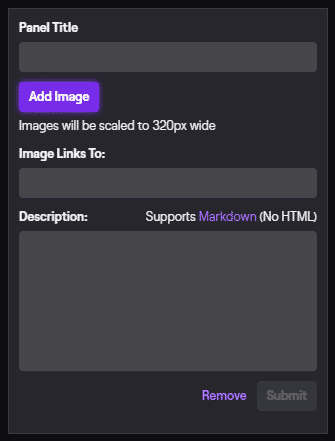
On a panel box, click the “Add Image” button. If you don’t have an image, you can input something in the panel title section. The panel title will show up in a heading-style format above the image and description. You can also choose to leave it blank if you want the panel image to be the main focus.
-
Step 6
Select the file of your choice from your computer. Once you have uploaded it to Twitch, you will press the purple “done” button to add the panel.
-
Step 7
Add any links or descriptions you want added with the panel to the box. Then press submit.
-
Step 8
Click the “Edit Panels” switch to off to check your finished panel for accuracy. Make sure that they look good with other custom panels on your Twitch channel so that the screen will look good to your audience.
The process is so easy that you can edit your Twitch panels anytime you need to in the future. You simply need to toggle the edit button, then follow the above steps, make any editing change you need, then click the submit button to finalize the process.
Pay attention when editing each panel to avoid potentially embarrassing mistakes. That being said, Eljayem_ pointed out in his video on the topic that occasionally, people visiting his stream will make a comment about a typo or two in his bio. While he could switch out the issues by editing the text, he realized that engagement is more important to his channel.
Which Panels Should You Add?
When setting up your Twitch channel, adding more than just a donation panel is a good idea. Many content creators choose to avoid using the tips option and set up other panels instead. Here are a few Twitch panel ideas to get you started:
-
Streaming Schedule
Always put your stream schedule in your description. Whether you show them as an image or you write out your schedule, it is good for your viewers to be able to see when you stream on Twitch when they visit your page.
-
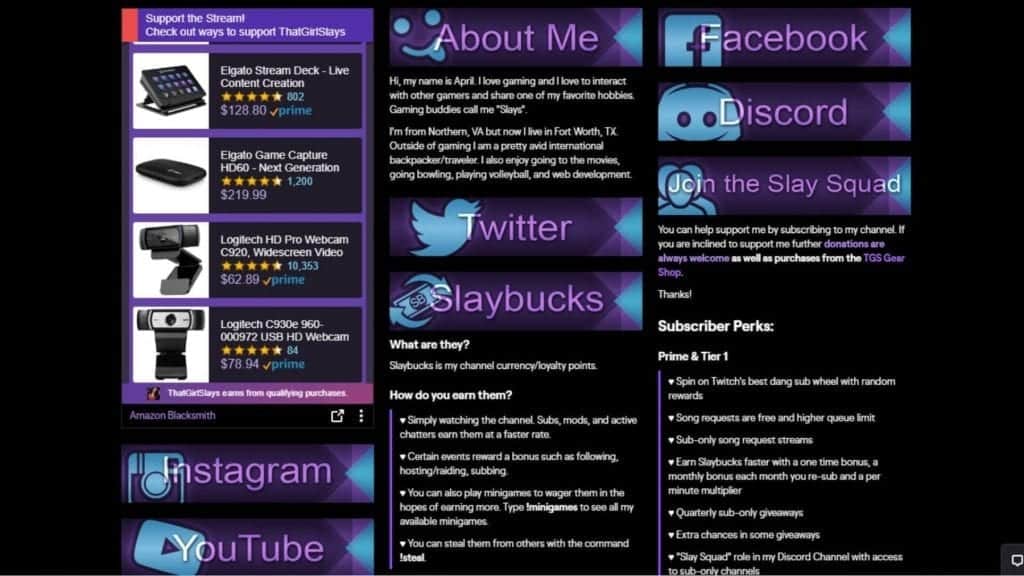
About Me Panel
You should always create info panels that tell your audience more about your Twitch channel. Include a little information about yourself and the games you stream. Treat it like you would a profile page on your other social media pages. Many people want to know about you in greater detail so that they can find a way to relate to you.
-
Social Media
Add panels for each of your social media accounts. This will help passively build your influence over time, allowing you to sidestep your brand in the future. You can also alert those following your social media whenever you make a major change with your Twitch channel. You can use image links as panels for each network. When other Twitch users click on the panels, the links will take them to the appropriate profile.
-
Images
Add images to your panel section. Not only will this break up the text, but it will also allow your viewers to see a little glimpse into your day-to-day life. If you are uncomfortable with adding photographs, you can add images related to your overall branding.
-
Extension Panels
Save space for your favorite Twitch extensions and plugins. Again, space these through your Twitch profile in a visually appealing way. Make sure to add one to your donation page (if you have one).
What Size Should the Twitch Panels Be?
While there isn’t a specific Twitch panel size, you will need to stay within the platform’s guidelines. The new panel needs to be no wider than 320 px, but can be longer than the standard 200 px high. This allows you to incorporate image panels between those with text to keep your about section looking visually appealing. You can also add an extension panel or two between them to keep your viewers engaged.
Panels Providers
Here are our top picks for the best Twitch panels:
-
OWN3D
Own3D has several full packages of Twitch graphics as well as individual panels. They have hundreds of options on their site that you can purchase and immediately add to your channel. The platform is always creating new products so you can always check back to see if there is something new that you will enjoy.
-
Placeit
Placeit is a platform that offers several customizable templates and an in-built panel maker. You can mix and match images, colors, and elements to create a custom product that is branded perfectly to your channel. The example used in this article was created on Placeit in about two minutes.
-
Nerd or Die
Nerd or Die offers free Twitch panel templates as well as professionally designed panels included in the full-service packages. They have a broad range of inventory that appeals to a wide audience.
-
Fiverr
If you want custom panels, check out Fiverr. Fiverr is a marketplace where you can find numerous artists and designers who are happy to design custom Twitch panels for you. Whether you need multiple Twitch panels or just want a new panel for a specific section, you can search through the portfolios database until you find a graphic designer you like.
You can also create a panel graphic using image editing software. Learning to design your info panels yourself is the best way to get free Twitch panels that are custom for your page.
While there is a learning curve to these programs, there are numerous YouTube videos online that can show you an example of how Twitch panels are made. Learning to create your own panel image will give you full artistic control of your channel.
Add Information to Your Panels on Your Channel Page
It is a good idea to fill out your Twitch about me section so that people can easily find out your content and channel information. You can also link to your socials and Discord channel so that you can build your following on all platforms at the same time.
Make sure that when you edit panels on your own channel, you write original content that is related to you as a person and the content that you stream. Out of all the Twitch streamers on the platform, your community has chosen to connect with you and if you fill your description with a copy/paste of someone elses’ channel description, they won’t get an accurate understand of who you are as a person. You have your own unique features that you should show off.
You can also add links to people or organizations you support, including other streamers. Switch out a few different panels from time to time to create a feeling of freshness.
Conclusion
Twitch panels are one of your channel’s many visual representations of your brand. Find the perfect balance of adding enough relevant information to your bio to keep your viewers interested. You can always spend a bit of time later on editing the information to ensure that it is current.
Whatever you decide to do, when creating a Twitch panel, you should show off a few of your personal features to keep them relevant to your channel. That way when people scroll down from the video screen, they will learn who you are and divide whether or not they will return to watch you live.
Once you know the steps it is easy to add panels or edit an existing panel on your Twitch channel. Take your time to customize each one so that they look in line with the overall branding of your stream. Creating multiple different panels of all shapes and sizes can create a look of uniformity that will appeal to both your audience and gaming brands looking to sponsor your Twitch channel.
We hope you have found this article helpful in learning how to display information on your Twitch profile. While live streaming on your Twitch channel can be tricky to start off with, your Twitch panels will help you connect with several viewers who visit your stream.
Luci
Luci is a novelist, freelance writer, and active blogger. A journalist at heart, she loves nothing more than interviewing the outliers of the gaming community who are blazing a trail with entertaining original content. When she’s not penning an article, coffee in hand, she can be found gearing her shieldmaiden or playing with her son at the beach.